Introduction
Are you struggling with your glasses making weird reflections every time you teach? In this lesson, we’re going to go over how to properly set up your lighting and which kinds of glasses to use so that you can teach online. That way, you can create online courses, participate in Zoom meetings, conduct webinars, and more, all while maintaining a professional appearance.
Whether you’ve been wearing glasses for years or have recently acquired them, the virtual classroom setting can pose some unforeseen hurdles. However, glasses need not be a hindrance. We will explore the art of teaching online while wearing glasses and offer valuable insights to help you not only overcome any potential obstacles but also embrace your eyewear as an integral part of your virtual teaching persona.
Challenges online course creators can face if they don’t learn how to teach while wearing glasses:
- Glasses can cause distracting reflections and glare on the camera, impacting the visibility of your eyes and content.
- Prolonged screen time while teaching online can lead to eye strain and discomfort for glasses wearers.
- Constant adjustments or discomfort due to glasses can be distracting for both the instructor and students.
- Insecurities about one’s appearance with glasses can affect confidence and presentation.
- Choosing the wrong frames or materials may interfere with technology like green screens or facial recognition.
Video Lesson – How To Elevate Your Look and Increase Your Student Connection To Help You With Your Courses, Social Media and Webinars
Who Can Use?
Almost any kind of teacher or professional can use their knowledge of teaching with glasses to enhance their teaching experience.
- To create relatable content on design principles and ergonomics for digital artists.
- To incorporate their experience of teaching with glasses into posts about personal branding, overcoming self-consciousness, and effective webcam setup.
- To share insights on balancing visual artistry and eye comfort while teaching online sculpting classes, promoting both creativity and eye health.
This can work for a wide range of professionals like graphic designers, sculptors, and bloggers.
What Is It
It refers to guidance, strategies, and tips for individuals who wear eyeglasses and are involved in online teaching or virtual education. It addresses the challenges and solutions related to the use of glasses in an online teaching environment, covering aspects such as minimizing glare, ensuring clear visibility, and enhancing the overall teaching experience while maintaining professionalism.
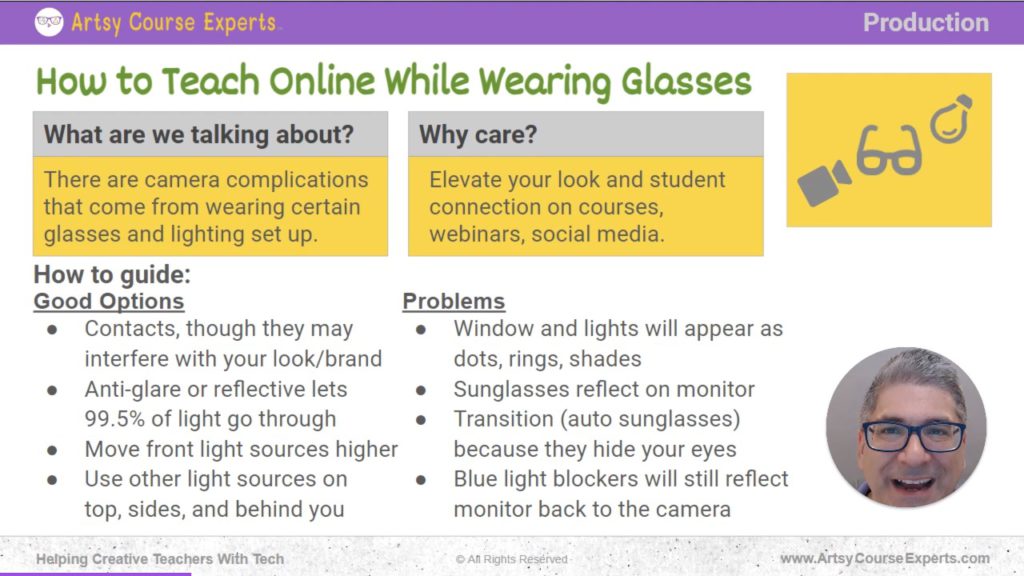
We’re addressing camera complications that can arise from wearing certain types of glasses and incorrectly setting up your lighting. That’s what we’re going to delve into. Those peculiar, bothersome reflections that appear on your glasses might not be visible to you, but they show up in the final camera footage, recordings, Zoom calls, Google meetings, and more.
Why Should You Care?
You want to enhance your appearance and strengthen your connection with students during courses, webinars, and on social media. You aim to establish direct eye contact without any distracting elements.
You don’t want them to see your eyes along with ring lights encircling your eyeballs or large squares due to your monitor or windows reflecting in your eyeglass lenses.
That simply appears absurd. In essence, you want to enhance your appearance and establish a genuine connection with your students, as if you are teaching them face to face. This will benefit your courses, webinars, and social media.
How To Guide
Let’s dive into a how-to guide. First and foremost, let’s discuss a couple of excellent options you can explore.
Good Options
Contacts
If your look doesn’t depend on glasses, you may switch between wearing glasses and not, and that’s alright. For specific important presentations, opt for contact lenses. They are convenient and cost-effective.
Need Coaching? We Got You.
Level up your business with an experienced tech partner.

Check out our 1:1 personal pathfinder, small group leader Zooms, or quick technical audits.
Anti-glare or Reflective Lenses
The next option includes anti-glare or anti-reflective glasses. These reduce the appearance of lights on your lenses. They work by allowing light to pass through the glasses rather than bouncing back into the camera. Anti-glare and anti-reflective coatings are valuable additions.
Position Front Light Sources Higher
For those wearing glasses on camera, it’s essential to adjust the position of front light sources. Lights directly in front should be raised higher, by around eight inches to a foot, or positioned at a slightly different angle. If there’s a ring light situated directly behind the camera, it’s advisable to raise it significantly.
If a window is positioned in front of you, behind the monitor, it might cast light directly onto your glasses; consider covering such windows. Additionally, if there’s a light just behind the camera, raise it higher to ensure it’s at the right angle and doesn’t appear in your camera footage.
Use Other Light Sources On Top, Sides, and Behind You
If you’re wearing glasses, another effective solution is to utilize alternative light sources. These can be positioned much higher, such as on the ceiling, or on the sides and corners of the room. Alternatively, placing lights behind you can also help. There are various options available, and you can explore photography resources on three-point and four-point lighting setups for further guidance.
You don’t want to have light right in front of you, and then you do want to have lights everywhere else, right on top of you, on your side, behind you. It could be pointing at you, or it could just be a nightstand light, Just something nice that’s sitting on your desk or somewhere behind you.
Problems
Now, there are a few issues with wearing glasses and dealing with lighting, so let’s discuss some of them.
Windows and Lights May Appear as Dots, Rings, or Shadows
Firstly, windows and lights can create dots, rings, or shadows on your glasses. It’s crucial to pay attention and refrain from immediately starting the recording. Take a moment to observe how you appear on camera. For instance, if you have two windows in front of you, both may reflect on your glasses. Similarly, if there are windows behind you, they might cast such brightness that you appear darkened.
Sunglasses Reflect on the Monitor
Avoid wearing sunglasses on camera, but you may have transitional glasses, which are like automatic sunglasses. They can be useful if you’re both indoors and outdoors, but they can cause issues for you.
Transitional Glasses Can Hide Your Eyes
In general, sunglasses are highly reflective, and transitional glasses can obscure your eyes in the wrong setting. You might not notice this while wearing the glasses, but it will show up on camera, leading to the next problem.
Blue Light Blockers Reflect Monitor Light
Blue light blockers, which are designed to block blue light, can reflect the monitor’s light toward the camera. While these glasses are great for reducing blue light exposure before bedtime, they can create issues while on camera. On film, you might see the blue light from your monitor reflected on your lenses, resulting in one or two rectangles on each lens. Therefore, it’s advisable to avoid glasses with blue light blockers when recording your courses or webinars.
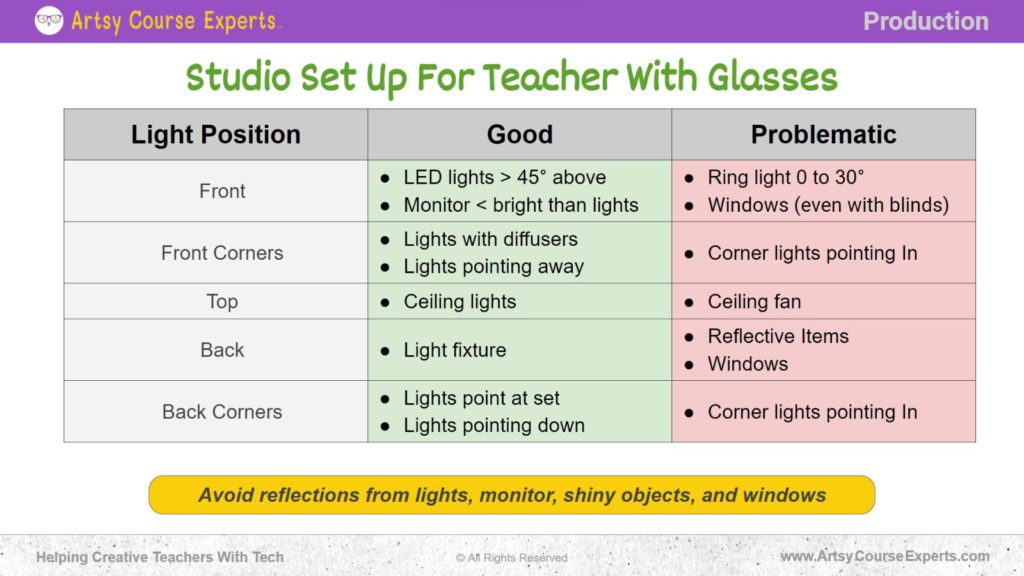
Studio Setup for Teachers with Glasses
Now, let’s explore how to set up your studio, whether it’s at home or in your office, so you can record online courses, conduct webinars, and participate in Zoom meetings, and coaching calls.
Front Lighting
First, consider the position of the lights in front of you. Ideally, lights should be positioned about 45 degrees above you, even just a foot higher can make a significant difference. Avoid having them directly in front of you; instead, place them slightly above you at an angle.
If you have a ring light right behind the camera, it will reflect on your glasses, creating one or more ring-shaped reflections on each lens. Depending on when you’re recording and your environment, adjust the brightness of your monitor so that it’s not the brightest source in your studio or room.
Also, be mindful of windows in front of you; even with blinds, horizontal lines may appear, affecting both your glasses and your appearance. Consider using curtains or shades when recording and supplement with other lights.
Front Corners
In the front corners, either on your right or left, you may want to add additional lights and consider using diffusers. These are similar to the “socks” used by photographers. Ensure that the lights are pointed away from you to prevent reflections on your glasses. Even if they are directed away, they can still bounce light off the walls, and doors, and not affect your glasses.
Avoid having the corner lights pointed toward you, as this can result in varying-sized reflections on your glasses as you move your head. Be cautious about the positioning of lights to achieve the best results.
Top Lighting
It’s perfectly fine to have a chandelier, ceiling lights, and so on. When choosing light bulbs, consider different options, some with a more whitish hue and others with a warmer, yellowish glow. These differences are often listed in Kelvins as warm or cool. Be cautious of ceiling fans; if you have one, turn it off to avoid potential flickering lights that could affect your camera footage. Make it a part of your room setup procedure: turn on the lights, close the window blinds, and turn off the ceiling fan.
You can certainly have a traditional lamp as a part of your set, but be mindful of additional windows behind you, as their brightness can cast a shadow over you, making it difficult for students to see your facial expressions and gestures as you teach. Also, watch out for reflective items like photo frames, awards, or electronic gadgets with reflective plastic surfaces; they can create unwanted reflections in your camera footage. Consider moving or repositioning them as they may be in your set whenever you decide to record.
Back
Turning our attention to the overall setup from the back perspective, consider your back area, which might not be directly behind you but still within view. This part of the setup can add depth and character to your online teaching environment.
If you have a dedicated backdrop, you might want to adorn it with a few strategically placed lights or decorations. Be creative, but ensure that these elements do not introduce unwanted reflections or distractions in your video. It’s important to maintain a harmonious and distraction-free atmosphere that allows your teaching to take center stage.
Remember that what’s in your background can send a message to your students, so choose elements that align with your teaching style and subject matter. Whether it’s a bookshelf, a motivational poster, or other props, make sure they enhance your online teaching presence without causing unintended disruptions in your video content.
Back Corners
Moving to the back corners, not immediately behind you but to your left and right, you can place lights. These lights can be directed toward the set or whatever is behind you, be it a small stage, a plant, or a shelf. Lights pointing in that direction can enhance the overall setup. However, be cautious and avoid back corner lights that are pointing toward you, as they can result in reflections on the opposite side of your glasses, causing distracting dots. Adjusting the position of the lights further away can eliminate this issue and help you achieve an excellent setup.
Frequently Asked Questions About How to Teach Online While Wearing Glasses
Summary – How to Teach Online While Wearing Glasses
Teaching with glasses need not be a challenge but an opportunity to enhance your teaching presence. By addressing the common issues of glare, reflections, and studio setup, you can create a professional and engaging teaching environment.
Accept your eyewear as a part of your unique teaching persona, and remember that the key to successful online teaching lies in clear communication and confidence. With these insights and tips, you can navigate the virtual classroom with ease, ensuring that your knowledge shines through, and your students see the educator you truly are, glasses and all.
Tips for Creative online course creators when teaching online while wearing glasses:
- Avoid wearing reflective jewelry or accessories that can cause distracting reflections on your glasses.
- Opt for glasses with anti-reflective coatings to reduce glare and maintain clear visibility in online courses.
- Set up your studio with even indirect lighting to minimize reflections on your glasses.
- Make an effort to move your head naturally to avoid overemphasizing reflections as you teach.
- Before recording, check your setup by recording a short sample to identify and address any potential glare or reflection issues.
You should be a little smarter now. Thanks for hanging out!
Please subscribe to get more tips for creative online course teachers.
More Tips For Online Teachers
These lessons can also help you with Operations and Technology:
- Backup Tips for Creative Online Course Teachers
- A/B Testing for Creative Online Course Teachers
- Diversity, Equity, and Inclusion (DEI) For Online Course Creators
- How To Make A Teacher Bio That Sells
- The Is This Course For You Section
- Creative Course Glossary