Teachers making online courses should develop a process to get feedback from a variety of sources in order to make sure that lesson slides, examples, video, audio, and configurations have been checked for errors and quality.
While there are education and marketing movements to release content as fast as possible – such as for blogs, this may not be the best strategy for premium paid courses. Also even if you release your course quickly, you can still benefit greatly from getting immediate feedback soon after launching.
The benefits of getting 3rd parties to check your content include:
- Reducing the number of refunds
- Avoiding bad publicity and student reviews
- Keeping your course ratings as high as possible
- Insuring your students learn what was promised
- Preventing negative comments in your community or social channels
In this article, we’ll first brainstorm why teachers should invest time checking their content.
Secondly, we’ll go over a bunch of content problems that teachers should look out for. This includes reviewing slides, video, audio, examples, and the course web app.
Thirdly, we’ll go over some great sources of internal and external feedback for your online course lessons.
Finally, we’ll summarize the most important tips for creative teachers that want to level up their lesson quality.
Lesson Issues With Slide Content
First of all, you should check your slide’s main content for typos and grammar issues. While it’s ok that you may have abbreviated versions of sentences in your titles and bullets, the content should be clear. Unless you’re showing off a short quote, try not to have a giant page full of text. And of course, check your font size. You may think your font looks good when you’re creating it in keynote or google slides, but trust me, go up a few font sizes for the final lesson content. Even if you show less content, bigger hook content with your verbal notes is way better than lots of unreadable words.
If you use images on your slides or videos, they should be helpful, clear, and not pixelated. You should also check that your images are royalty-free, licensed, and have attribution if required. And while images of stuff may be obvious to you as a master creative teacher, they may not be to your students initially. So consider using captions above or below your images with a short explanation like “Using a glue gun away from the edges”.
When you use bullets you need to choose unordered bullets like dots or ordered bullets with numbers or letters for sequences. Also sometimes bullets have a hierarchy, so if necessary use the tab feature to create children under a bullet. If you feel inspired to use other bullets that make more sense go for it – as an example it could be checkmarks, check boxes, musical notes, or flowers.
- First Drama Thing
- Second Drama Thing
- Third Drama Thing
Often as we are building our course we copy and paste multiple slides. We usually do this to leverage a common style or layout. But when doing that, we can forget to update or check the common parts of a slide. So when reviewing your slide, check that the common stuff like header title, content title, and footer text is correct for the current lesson.
Depending on your content format and video editing team, you may decide to have an intro title slide before every lesson. Make sure the full screen title slide matches the lesson name and the lesson slide title. Since this is part of the assembling process, it’s very likely that different people provided course components and an error can easily happen when combining the assets.
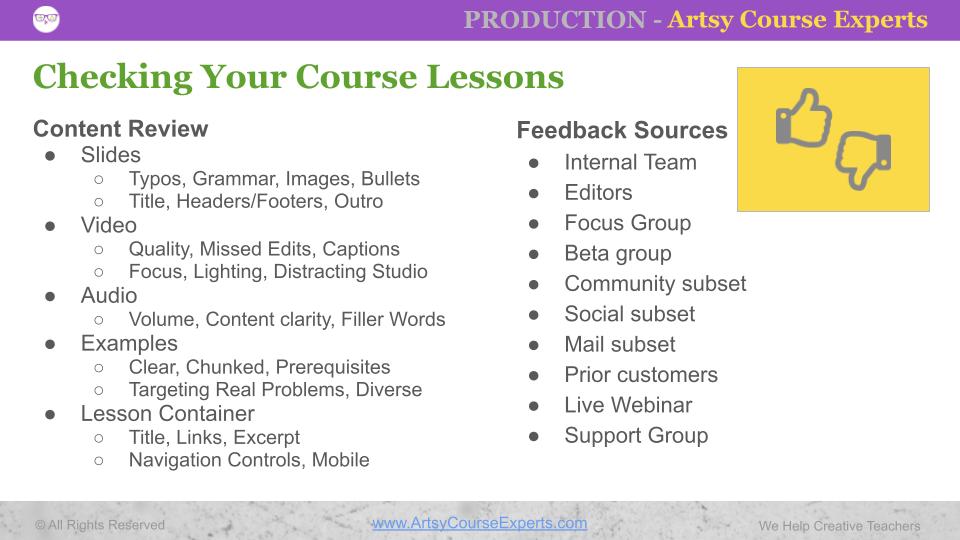
Video Lesson Issues
Often creators take multiple recording takes because they will edit the video later, but sometimes the original blooper clip is still in the lesson. So please make sure you or your feedback team check that you didn’t leave in a blooper. And if you do make a blooper, take a pause, knock on a table 3 times, or do a visual thumbs down to make detecting a blooper easier during editing. Also try not to get visually mad or make extra weird face motions, just in case the video clip does make it out for a few weeks.
Once you’ve uploaded your video, you’ll want to make sure that it is high definition, not choppy, and streams smoothly. To start, use a good format with the latest video encoder and compression options like H.264 or H.265 with an .MP4 extension. Your learning system server, cloud file server like Vimeo or AWS S3, or Content Distribution Network (CDN) may further create variations for different types of devices (e.g., windows, android, ios) and even create various versions for different internet speed bitrates (e.g., low-speed connections < 256kbs, mobile broadband <512kbps, high-speed connection >1Mbps). So as your testing, you’ll want to have different users, located in different places, using different devices, and different internet connection speeds.
Verify your video lesson captions and subtitles, especially if they’re automatically generated by some audio to text software. Remember depending on the context the technology could choose the wrong homonyms like write and right, or real and reel. This part is especially important if you know your customer base includes a higher percentage of students with different disabilities or foreign language speakers.
Make sure that the video camera was focused on the right things as you talk through your lessons. This includes zooming in/out and panning left/right when necessary to show the most important content. In some cases, it may make sense for you to have two cameras to switch between different views in the same lesson. Your edited lesson should balance showing essential content of you creating or performing while also showing some variety of you teaching and explaining.
You’ll also want to check the camera’s lighting. First, start by making sure your face is not darkened by some other light source. If you wear glasses, make sure they don’t show lots of light bulbs, windows, or computer monitor reflections. As a teacher, you don’t want a distracting studio so that students can focus on your content. And it’s not just about the lights in the room, but also other things like windows, mirrors, sunlight, moving fans, reflective/shiny items in the background.
Audio Lesson Issues
You’ll want to make sure that your audio is loud enough. Verify that the audio is clear and not muffled. Sometimes your mic may be too far, blocked by something your creating, or rubbing against your shirt and creating other distracting sounds.
Some people say that audio quality is more important than video quality. It does make sense that some students won’t be able to tolerate bad audio instructions again and again regardless of how good the video quality or content is. In some cases, you may be able to save a video lesson by having the audio amplitude raised and the audio track run through an audio filter to remove pops and clicks. These can be done with popular video editing applications like Final Cut Pro, Premiere, or VSDC.
As a teacher, you’ll want to make sure that you speak aloud about what you’re thinking and doing for your students. If you find yourself quiet for too long, then you may have some instructional issues. Even though it may be obvious as you do things with your hands, keyboard, or instrument – you have to be explicit and explain every step even if you are waiting for something to happen.
To polish your lessons, you may want to have your video edited to remove your filler words like long uhs and ums. While creative audiences may appreciate your raw and authentic self, if you find yourself stuttering too frequently, you can consider a cheat sheet, notes/slides on a second monitor, teleprompter, or script. Sometimes you just need to get in the groove by doing a second or third take for that lesson.
Issues With Lesson Examples
On your examples, you’ll wanna make sure that your examples are clear and your curriculum is chunked, and that that lesson is complete.
Students should know what were the prerequisites before taking that particular lesson so that it either builds up to a particular topic that is going to be taught or that the content can be taken independently from other material.
Are you targeting real problems that the students signed up for? The classes should provide solutions for real problems and not rare fringe problems. When teaching how to handle multiple problems, start with the most common or foundational problems first.
When developing your content, you should think about Diversity, Inclusion, and Equity (DEI). One way to help is to use a wide range of photos, products, and use cases to match the breadth of students that you want to serve. Students will want to see themselves and their situations in your training.
Issues With The Lesson Container
On most Learning Management Systems (LMS), every lesson is within some sort of an application container. This container has content like the lesson title, video player, and description.
Often during course development, lessons get tweaked. So make sure that the title of the lesson is close to whatever is on the slide, and video intro to the lesson if any.
Double-check that the lesson description and excerpt are the right one for this particular lesson. These mistakes can happen when you are cloning lessons quickly as you create your course.
If your lesson has resources, make sure they are the right PDFs and links for this lesson. Remember, you can’t really confirm what the resource is by the HTML link name (anchor), you have to click the link and see what opens up. Also, it’s good practice to have your links open up a new tab instead of taking you away from the course.
Some course systems let you configure discussions per course, module, or lesson. So make sure you enable or disable your lesson chats according to your plan and verify.
Finally, make sure that your course lessons looks good on different devices like desktop, tablet, and mobile. Don’t forget to also check the orientation to make sure the lesson looks good in vertical and horizontal positions.
Internal Teams
If you have an internal team you can use them to review your work. It doesn’t matter if they are full-time employees, part-time employees, or contractors.
Even if this isn’t their area of expertise, they can still do a quick review. This can also help them learn more about your business for future tasks.
Editors
If you happen to leverage a few editors for your course business, they can help you review your lessons too. Broadly editors can include skills like writers, graphic designers, video editors, photographers, and audio engineers.
Even if they didnt work on the new lessons, it’s still great to have fresh brains, eyes, and ears review your content. They not only might spot problems, but they could recommend updates to further improve your lesson.
Focus Group
Focus groups are a diverse collection of people that are assembled to provide feedback about a product via tasks or a guided discussion by a moderator. You can assemble your own group or use a third party to get feedback. The group can be small and intimate like 5 people around a table or as large as hundreds for a movie preview.
For course creators, a good method to get feedback on lessons could be to offer a free course link or share a set of videos online with direct links using services like Wistia, Vimeo, or YouTube. After the group goes through the videos they could use an online survey to give you feedback about each lesson.
Beta Group
A beta group is a set of prospects or customers that get early release of your new content. They may be your happiest customers, super fans, or they may have opted in to get special content. You may be able to hand pick your beta group or use email, social, or community to let fans opt in to check out and review your new course lessons.
Once you have a beta group, you can use them for other new content reviews in the future. Often you’ll want to have your beta group in an email list so you can keep them up to date on new content, issues, and feedback requests. Since your beta testers know your brand, products, and processes, they can quickly jump in to review a video, pdf, or service without verbose instructions.
Community Subset
A community may have one large primary room or it can have smaller topical or service-related rooms. You can even create a private room for feedback or communicate with some of your favorite community members using direct messages.
You can post a message to your group or subgroup to let them know that you are looking for feedback on a few of your new or updated lessons. You can provide the watch/survey link inline, or you can ask them to Direct Message (DM) you, join a room, or click a link to get added to the feedback group. The cool thing about a community is that you can even have a chat room discussion about the feedback. This allows your members to keep improving the ideas and opinions of what was shared.
Social Subset
Your social networks can help you get feedback, but it may be wide-ranging in perspectives and quality. Socials can include your favorite networks based on where your students are hanging out. Remember, you don’t have to be active on all social networks, though it is nice to lock in your course academy vanity url like social.com/YourWritingSchool.
You may decide to share a lesson or part of a lesson on social in hopes to collect some comments. Remember though, that sometimes comments are hard to edit or remove. You can also leverage your subscribers by announcing that you are looking for feedback and use a qualification survey to allow only a filtered subset to see your lessons and give you private feedback off the social network.
Mail Subset
You can use a small subset of your email list to get feedback. This list can made in a variety of ways such as:
- Random subset of email subscribers
- Email subscribers that have been with you the longest
- Use a new opt-in email that collects and tags testers
- Subset of customers that have high mail open or read rates
- Cross set of subscribers from another non-course service or product
Once you have this list, you can create an email to ask them to participate in the feedback or just send them the instructions. The instructions would give them access to the videos and include a survey link to collect specific feedback.
Prior customers
Your prior customers are often really excited to see your newest content. However, you may not want to show them your most raw content concepts until it is slightly more polished.
Prior customers contact information can be found across your course systems users, email list, and payment systems. And while customers may also follow you on social, they usually can’t be easily identified or extracted from non-paying customers.
Consider targeting customers that took a prior version of a course or a related course. If they took a prior course, you can let them know that the course will soon be updated and they can have access to it if you offer lifetime access. If they purchased a related course, this content (along with a large thank you coupon) may inspire them to purchase the new course.
Live Webinar
Although it can take some marketing time, setup time, and execution time, you can use a live webinar to test out content for your student ideal customer profile. You shouldn’t actually make your audience watch your videos, but you can go over some key content with your audience to see how it resonates.
Here are some ways to get course feedback via a webinar:
- Prompt your audience and review all the chat room questions
- Look at their faces when you are not on spotlight or screensharing
- Allow webinar questions for a period of time near the end
- Send a follow-up email link to everyone that joined with a survey
- Offer a pre-sale for your full course and see how many viewers sign up
Support Group
As a teacher, coach, or entrepreneur, you may have your own support group. These may be business advisors, mastermind group, old co-workers, or friends that know about what you do.
Try to build a template but customize each emails that you send to friends. A good outline includes a friendly personal intro, how you are looking for feedback, the lesson links, and how they can best get you feedback by replying, calling you, or using a survey. I like to send high-quality feedback to my friends using loom to record the screen, my camera, and audio notes and reactions.
Frequently Asked Questions
Feedback Sources

Summary Of How To Check Your Online Lessons For Quality
Whether you create content quickly or slowly, you should still check your content by getting feedback from a wide range of students and advisors.
Verifying your content will help your course look more premium and high-quality. Prospects will think that your course is worth the price and that you can help them with their problems and goals.
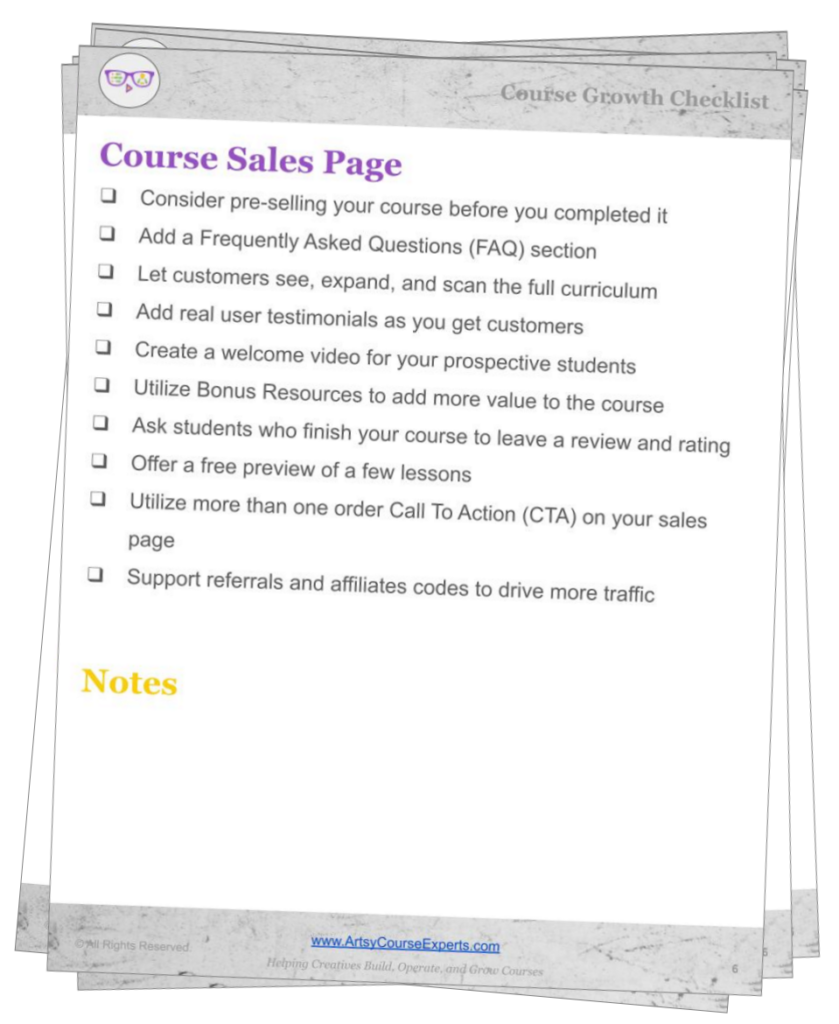
Here are a few of the most important areas to check when creating a lesson:
- Check the text on your slides
- Rewatch your video from beginning to end
- Get students with limited skills to tell you what they don’t understand
- Listen to the volume level on a different device
- Verify the content is focused and understandable on its own
- Match the curriculum navigation bar info with the lesson
Over time, checking your lessons will become part of your content creation process. Your process will become more thorough and may take more time, but your quality, fans, and revenues will grow as you become the best creative teacher in your niche.
For more creative teacher help building, operating, and growing your online courses, check out our ArtsyCourseExperts blog and subscribe to our email for regular tips.
More Tips For Online Teachers
The following articles and resources can help you create higher-quality modules and lessons for your creative students.
- Diversity, Equity, and Inclusion (DEI) For Online Course Creators
- Is It Easy For Students To Ask The Teacher Questions?
- Using The ADDIE Model To Design Effective Online Courses
- Using Ratings And Reviews In Your Online Courses
- Captions and Subtitles For Online Course Creators
- How To Create A Guide For Your Online Course?
- Do You Keep Your Prior Course Students Updated
- Help Students With End of Lesson Transitions
- Course Pictures With Tools and Work
- Using Surveys To Grow Your Course Sales