Introduction
Are you feeling stuck in the never-ending cycle of re-recording your instructional videos? You’re not alone! As teachers and coaches in creative fields, producing content can feel like an uphill battle. Here’s a quick look at some of the common struggles that come with filming and re-recording:
- Constant retakes due to minor errors or imperfections
- Balancing professionalism with authenticity
- Managing time efficiently while maintaining quality
- Dealing with unexpected technical or environmental issues
In this guide, we’re diving deep into the nitty-gritty of when to say, “Let’s run that again,” and when to say, “Good enough, let’s edit and move on.” Read on to discover tips to streamline your video production process and focus on what you do best: teaching and inspiring!
What Is It?
What exactly are we talking about here? In the world of video production, “re-recording” is the process of filming a scene or entire lesson all over again due to dissatisfaction with the previous take. For creative educators, whether you’re teaching design, performing arts, writing, or any other discipline, understanding the nuances of re-recording can save you precious time and energy.
A re-record may be warranted if the content being delivered doesn’t meet the desired quality or if critical elements were missed. However, excessive perfectionism can lead to a never-ending cycle of retakes. Knowing when to accept imperfection and move on with editing magic is key.
In this article, we’ll help you distinguish between necessary and unnecessary re-records, allowing you to make impactful videos without burning out.
Why Use It?
Why should creative teachers even worry about re-recording their videos? Here are a few reasons why mastering this skill can be a game-changer:
Professional Quality: Judiciously re-recording can elevate your video to professional standards without requiring extensive post-production tweaks.
Authenticity: Sometimes, embracing minor imperfections can make your lessons more relatable and human. 🎭
Efficiency: Knowing when to re-record helps streamline your production process, saving you time and money.
Learning Opportunity: Re-recording allows refining your on-camera presence and delivery.
Here are some use cases where re-recording might be advantageous:
For intros or pivotal content that forms the foundation of your course or launch strategy.
During live demonstrations or tutorials, if a crucial step is omitted or performed incorrectly.
When audio quality issues threaten to undermine your presentation.
If significant changes to the script or slides necessitate a new take.
When the visual setting is noticeably disruptive or counterproductive to the lesson.
How-to Guide
Let’s break down the essential tips and tricks for effective re-recording in your creative teaching journey.
Getting Ready
Start by preparing thoroughly. Ensure your energy levels are high, and warm up your voice and muscles. You’re not just a creator; you’re a performer! If your first take is simply an energy booster rather than a perfect cut, don’t fret; that’s perfectly normal.
Tip: If you’re feeling low, take a walk, do some light stretches, or drink water to re-energize before hitting record again.
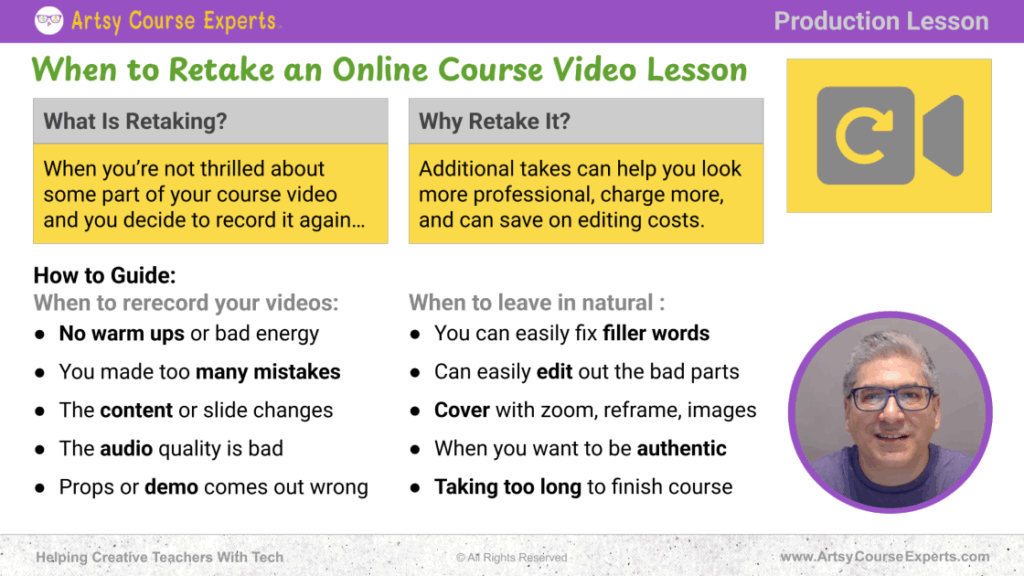
When to Hit Record Again
Sometimes, a retake is unavoidable. Here are some scenarios:
- Critical Mistakes: If you flub key points or the sequence of steps, consider a retake. Accuracy matters.
- Technical Glitches: Poor audio or video quality can distract from your message. Check your equipment before starting every session.
- To Preserve Consistency: When your lesson deviates from established teaching materials or guidelines, it’s vital to rerecord for consistency.
Embracing the Imperfect
Remember, perfection isn’t always necessary. Authenticity often resonates more with your audience. If performance mistakes are minor and don’t detract from the overall learning experience, consider leaving them in for a more relatable vibe.
Tip: Let learners in on the process; a minor mistake can be an engaging “teachable moment.”
Leverage Technology
In many instances, effective editing can save a recording. Software tools can eliminate filler words and smooth transitions. If a part of the visual frame is problematic,perhaps the unexpected reflection of a chaotic background, cropping or strategic picture-in-picture overlays can help.
Wrapping It Up with Confidence
Your final step is decision-making. Did the lesson meet the basic quality standards you’ve set? If the major elements of your recording are intact, embrace it and move forward. The goal is to produce an engaging, educational experience for your audience—even if it’s not cinematic perfection.
With these insights and strategies at your fingertips, you’re now equipped to handle re-recording like a pro! Keep your authenticity alive, focus on your strengths, and transform your filming dilemmas into delightful lessons for your creative community. You’ve got this! 🚀
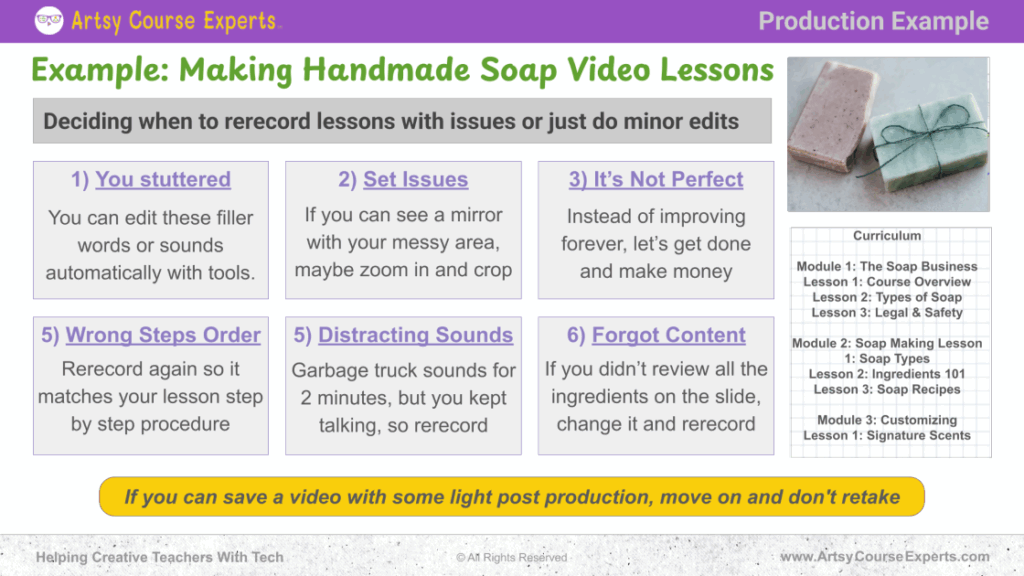
Example: When to Record Again
In the bustling world of creative online courses, knowing when to hit the “rerecord” button or when to move on is a game-changer. Whether you’re teaching design, fashion, writing, or music, balancing quality and efficiency is key. Let’s explore some practical scenarios to give you clarity and keep your production flowing.
Filler words haunting your clips like persistent ghosts? Don’t sweat it. Many tools can magically erase those “uhs,” “ums,” and repeated words. They’re your secret weapon against the dreaded retake, saving you from potential time-sinks.
Tackling Set and Scene Mishaps
Ever found a mysterious object in the background only after filming that epic soap-making tutorial? Before spiraling into a re-recording spree, consider cropping the video or adding overlays. These simple post-production tweaks keep your course focused and your editing efficient.
Embracing Imperfect Demonstrations
Let’s be real: not every demo runs smoothly. If your handmade soap shade is slightly off, it might just be a teaching moment about variability in crafts. Authenticity teaches your students just as much as step-by-step perfection.
Correcting Procedural Missteps
Lost your way and mixed up your well-rehearsed steps? For key processes, clarity is your North Star. If steps 3 and 5 went rogue and swapped places, it’s time for a retake, ensuring your students get the precise method every time.
Overcoming Unplanned Noise
Imagine perfecting that flawless take, only to have it disrupted by a cacophonous garbage truck. For audio mishaps, pause and regroup. A quick break refreshes your energy and gets your production back on track with clarity and focus.
By applying these strategies, creative educators, from sculptors to vocal coaches, can optimize their video production, maintaining quality without unnecessary delays.
FAQs About Recording Again

Summary Of Knowing When to Rerecord
Navigating the decision to rerecord or edit is crucial in creative teaching. Here are key takeaways:
- Employ editing tools for minor errors.
- Be prepared to embrace imperfections as teaching moments.
- Maintain a high standard for audio quality.
- Prioritize procedural accuracy in demonstrations.
- Leverage strategic video editing to resolve visual hiccups.
You’re now better equipped to handle these challenges with finesse, keeping your creative juices flowing!
Next Steps
Ensuring your online courses shine has never been easier. If you need tech assistance or advice on building or enhancing your creative training empire, reach out to us. Our team at Artsy Course Experts is here to help you unlock your potential.
If this guide helped you, consider subscribing to our newsletter. Get exclusive insights, tips, and tools straight to your inbox, helping you take your creative business to the next level. Let’s thrive together! 🎨🌟
So now, you’re a lot smarter. Thanks for hanging out!
Please subscribe to get more tips for creative online course teachers.
More Tips For Online Teachers
These lessons can also help you with Education and Course Content:
- Using Google Alerts as a Powerful Research Tool
- Power Up Your Creative Course with Video Sales Letters
- Email Subject Line Tips for Online Teachers
- Using Slide Templates to Create Your Course Content
- Validating New Course (And Other Service) Ideas